Once upon a time, I used to be flummoxed by food writers who said things like, “No one really needs a recipe for soup, but….” Huh? I thought. I need a recipe for soup. What, am I supposed to just throw a bunch of stuff into a pan and hope it turns into soup?
Then I cooked a lot more, and read a lot more, and acquired several dozen more cookbooks, and started following a number of food blogs that I haven’t dared to count lately. And somewhere along the way, I realized that, yes, to make soup, you more or less throw a bunch of stuff into a pan, add some liquid, and eventually you have soup. If you have access to a stick blender (or a regular blender or food processor or even a food mill), you can make soup of a very smooth, creamy, homogenous consistency. If not, you are likely to have chunky soup.
Here is the basic soup-making plan that I follow these days for any and all vegetable-based soups (you can see some other examples here and here):
1. Start with the vegetables you plan to use. They can be raw, or already cooked, or a mixture of the two. If they are raw, you can sauté them briefly in oil or butter to add a more complex flavor, but this isn’t necessary. If you aren’t puréeing the soup, you might want to chop the vegetables to a more or less uniform size that will fit in your mouth. If you are puréeing the soup, this doesn’t matter so much.
2. Add liquid. This can be homemade stock, canned or boxed broth, leftover cooking liquid, or even water. Don’t add too much; I usually put in just enough to cover the vegetables.
3. Put a lid on the pan and bring this mixture just to a boil, then lower the heat and simmer until all the vegetables are thoroughly cooked and soft. If the vegetables are already cooked, this is really just to get everything to the same temperature.
4. If you are blending the soup, do it now. I find a stick blender by far the best tool for this, since you can stick it straight in the pan and whizz away. If you are using any of the other methods, you’ll probably have to do it in batches, and be careful not to burn yourself, and then reheat the soup.
5. Once the soup is blended, return to the stove over a low heat. Check the consistency: if it is too thin, you can let it cook for a bit without a lid so it can thicken up, or you can add something like bread crumbs to help it along. If it’s too thick, you can add more liquid: more stock, cream, or, again, even water.
6. Once you’re happy with the consistency, you can season and garnish the soup according to your tastes and what’s in it. Some of my favorite garnishes include (depending upon the kind of soup) croutons, crisp bacon bits, or grated cheese—or sometimes all three.
And that’s it! Once you understand this basic method, you can make pretty much any kind of soup your heart desires. You can become one of those thrifty, creative people who cleans out their fridge into the soup pot.
Roasted vegetable soup
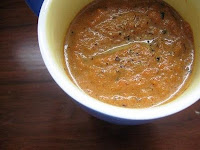
I used this method today to turn a container full of leftover roasted vegetables lurking in my fridge into a thick, hearty soup—a tasty, healthy, frugal, and warming way to start lunch on the first frosty Monday of 2011.
2 cups roasted carrots and onions
1 cup chicken broth
1 cup water
2-3 tbsp heavy cream
Cayenne pepper*
Put vegetables and liquids together in a medium-sized pot and bring to a boil. Lower and simmer for about 5 minutes.
Remove pan from heat and blend contents using stick blender. Return pan to low heat and stir in cream until mixture reaches desired consistency.
Season with cayenne pepper and stir through. Serve immediately.
Makes 2-4 servings as an accompaniment to a meal.
* The vegetables were already seasoned with salt and pepper, and the stock was salted, so I didn’t need to add any salt at the end. I did, however, grind over some black pepper.

0 comments:
Post a Comment